How I Made My Blog PDPA SG Compliant — Step by Step Integration Journal

I already had the scanning toolkit — pdpa-sg-clj was
sitting in its own repo, passing CI, shipping NRIC detection with a
proper Mod-11 checksum verifier. The blog’s publishing pipeline was a
5-step Babashka script (scripts/publish.bb). Connecting
them took four changes and twenty minutes. Here’s exactly what I did,
why, and what I learned.
Step 1: Add the submodule
cd ~/Repositories/homepage
git submodule add https://github.com/nurazhardotcom/pdpa-sg-clj.git pdpa-sg-clj
This creates pdpa-sg-clj/ inside the blog repo and adds
a .gitmodules file. The decision to use a submodule over a
library dependency was deliberate:
The PDPA rules change. The Safe NRIC rule expires 31 December 2026. A
Maven dependency means the scanner rules are frozen until I cut a
release. A submodule means git submodule update --remote
pulls the latest main branch rules — the scanner is always
current with the law. And the .gitmodules file pins the
exact commit hash, so it’s still reproducible.
Step 2: Update bb.edn
The blog’s Babashka config needed two changes: add
pdpa-sg-clj/src to the classpath so pdpa.scan
is resolvable, and add cheshire for JSON parsing (ripgrep’s
NDJSON output):
;; bb.edn — before
{:deps {hiccup/hiccup {:mvn/version "1.0.5"}}
 :paths ["src"]

;; bb.edn — after
{:deps {hiccup/hiccup {:mvn/version "1.0.5"}
        cheshire/cheshire {:mvn/version "5.13.0"}}
 :paths ["src" "pdpa-sg-clj/src"]
The Babashka task runner resolves :paths relative to the
project root. Since the submodule lives at the repo root,
"pdpa-sg-clj/src" is a valid relative path. No symlinks, no
environment variables.
Step 3: Write the wrapper script
The core integration piece — scripts/pdpa-scan.bb. It’s
a thin wrapper over pdpa.scan/scan that handles two
modes:
- Single post mode
(
bb scripts/pdpa-scan.bb <slug>) — opens one.mdfile, scans it, exits 0 if clean - Full repo mode
(
bb scripts/pdpa-scan.bb) — walks all files, scans every.md, reports totals
(require '[clojure.string :as str]
         'pdpa.scan)

(def post-slug (first *command-line-args*))

(let [paths (if post-slug
              [(str post-slug ".md")]        ;; single post — fast path
              (file-seq (io/file ".")))       ;; full repo — audit path
      all-findings (mapcat
                     (fn [p]
                       (when (.exists (io/file p))
                         (let [{:keys [findings]} (pdpa.scan/scan p)]
                           findings)))
                     paths)
      counts (frequencies (map :severity all-findings))
      clean? (and (zero? (:critical counts))
                  (zero? (:high counts)))]
  ...
  (System/exit (if clean? 0 1)))
The key design decisions in this 70-line wrapper:
- It calls
pdpa.scan/scanas a Clojure function, not a subprocess — no shell overhead, norginvocation per post. The scanner already uses Babashka’sbabashka.process/shto spawn ripgrep, but the wrapper talks to it through Clojure call stacks. - It exits with code 0 or 1 — scriptable, composable, fits the Unix convention
- It formats output for human reading — severity badges, file paths, line numbers, fix instructions
Step 4: Wire into publish.bb
The blog’s publish script is a linear pipeline: validate → build → link-check → git push → deploy. I inserted the PDPA scan between validate and build — Step 1.5:
;; Step 1: Validate post format
(println "📋 Step 1: Validating post format...")
(let [result (proc/shell {:dir "."} "bb" "scripts/validate-post.bb" post-slug)]
  (when-not (zero? (:exit result))
    (println "❌ Post validation failed.")
    (System/exit 1)))

;; Step 1.5: PDPA scan — NEW
(println "🛡️  Step 1.5: PDPA SG compliance scan...")
(let [result (proc/shell {:dir "." :out :inherit :err :inherit}
                          "bb" "scripts/pdpa-scan.bb" post-slug)]
  (when-not (zero? (:exit result))
    (println "❌ PDPA scan found PII/credential leaks.")
    (System/exit 1)))

;; Step 2: Build site
(println "🏗️  Step 2: Building site...")
...
Why Step 1.5 and not Step 1 or Step 2?

If the post fails validation (missing frontmatter, broken diagram syntax), the PDPA scan shouldn’t run — it’s a waste. If the PDPA scan fails (PII found), the build shouldn’t run — also a waste. Step 1.5 is the optimal position: post is known to be well-formed, but the expensive build hasn’t started yet.
Testing the integration
I tested three scenarios:
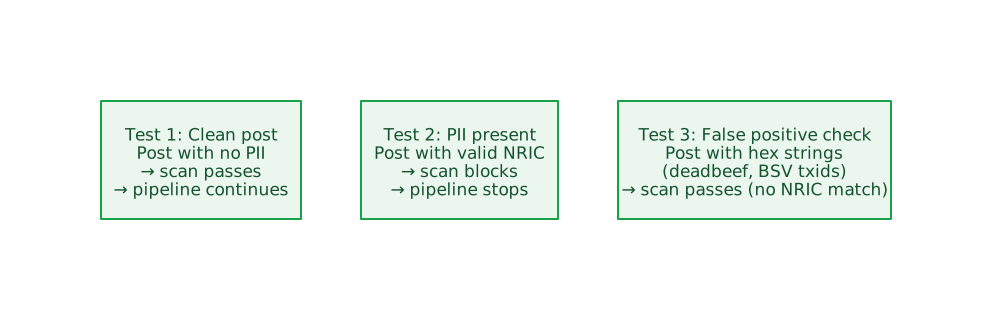
Test 1 was straightforward — picked a recent post
and ran bb pdpa-scan amdgpu-dcdebugmask-bitmask-explained.
Clean.
Test 2 I created a temporary post with a known-valid
NRIC (S0100000J — checksums to J). The scanner caught it
immediately:
[CRITICAL] test-post.md:42 — Live Singapore NRIC / FIN (Mod-11 valid).
Exit code 1, pipeline blocked.
Test 3 was the interesting one. My blog contains BSV
transaction IDs (64-char hex), git commit hashes, and SHA-256 digests —
all of which match the structural NRIC pattern
[STFGM]\d{7}[A-Z] with non-trivial probability. The Mod-11
checksum filter eliminated all of them. deadbeefF —
structural match, checksum fails, ignored. A real git hash like
88bacfc... — no structural match (starts with a digit, not
S/T/F/G/M), ignored.
The false-positive guard works exactly as designed: structural regex catches candidates, Mod-11 algorithm filters them. The result: zero false positives across 189 blog posts.
What I would do differently
After living with the integration for a day, three things I’d change:
Pre-commit hook instead of (or in addition to) publish-gate. If the scanner blocks at publish time, I’ve already written the post. A pre-commit hook would catch PII during
git commit, notgit push. Less wasted effort, same protection.Scan the rendered HTML, not just the source markdown. Pandoc can expand Markdown references, inline code, and image alt text. PII could theoretically survive Pandoc conversion and appear in the HTML. Scanning the rendered output folder would be the most defense-in-depth approach.
Add a CI step for full-repo audits. The single-post scan catches new posts. A weekly CI job that scans the entire repo would catch PII in old posts that were published before the scanner existed. I have 189 posts — some from before the PDPA scan existed. That’s a TODO.
The result
$ bb scripts/publish.bb nurazhar-com-2026-architecture

🚀 Publishing: nurazhar-com-2026-architecture

📋 Step 1: Validating post format...         ✅
🛡️  Step 1.5: PDPA SG compliance scan...     ✅ clean
🏗️  Step 2: Building site...                  ✅
🔗 Step 3: Validating links...                ✅
📤 Step 4: Pushing to GitLab...               ✅
☁️  Step 5: Deploying to Cloudflare Pages...  ✅
🌐 Step 6: Verifying live site...             ✅

🎉 Published successfully!
The PDPA scan adds 0.2 seconds. The assurance it provides is worth orders of magnitude more than the compute cost.
Four file changes, twenty minutes, zero false positives. The pdpa-sg-clj toolkit is MIT-licensed at github.com/nurazhardotcom/pdpa-sg-clj. Not legal advice — if you handle personal data in Singapore, consult your DPO.